Brief
Massage chair with modern mechanical technology to reproduce the traditional Chinese medicine meridian massage is an important daily health care equipment. The function of the massage chair is to integrate meridian massage of traditional Chinese medicine with modern high-tech means to help users enjoy a comfortable massage, reduce fatigue, and achieve the effect of health care and physical fitness. With the development of single-chip microcomputer intelligent control, a massage chair with STONE touch screen control application is also added.
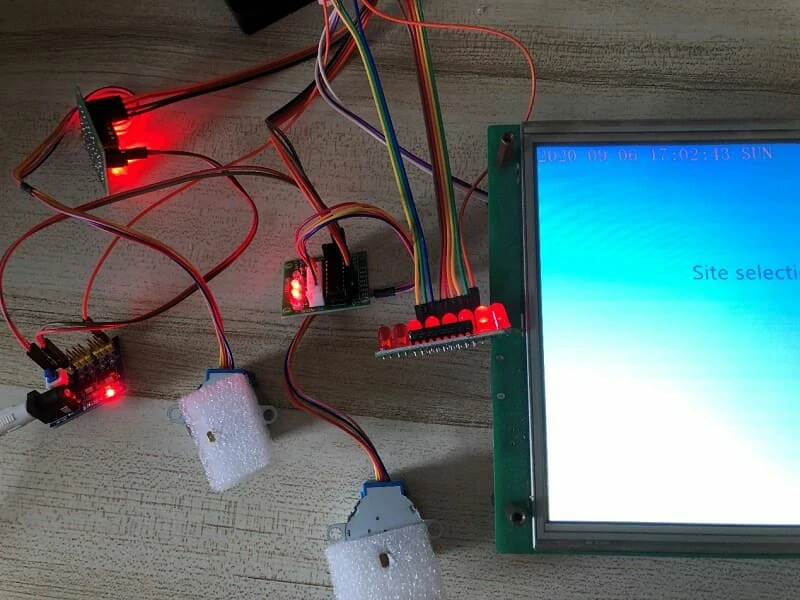
What we need to do here is such an application, select different modes through STONE Touch Screen, realize the control of MCU through serial port communication, and then realize the speed and rotation time control of stepping motor by controlling the level of specific IO, so as to realize the massage function of head and back. The system uses the STONE Touch Screen serial port screen, which can be used to do the touch display function. It is very convenient to develop. Only through the serial port can the MCU be controlled.
It is used in the massage chair, which can easily realize the setting of a massage function and the adjustment of massage strength, so as to achieve the effect of self-cultivation and reduce fatigue.
Project Overview
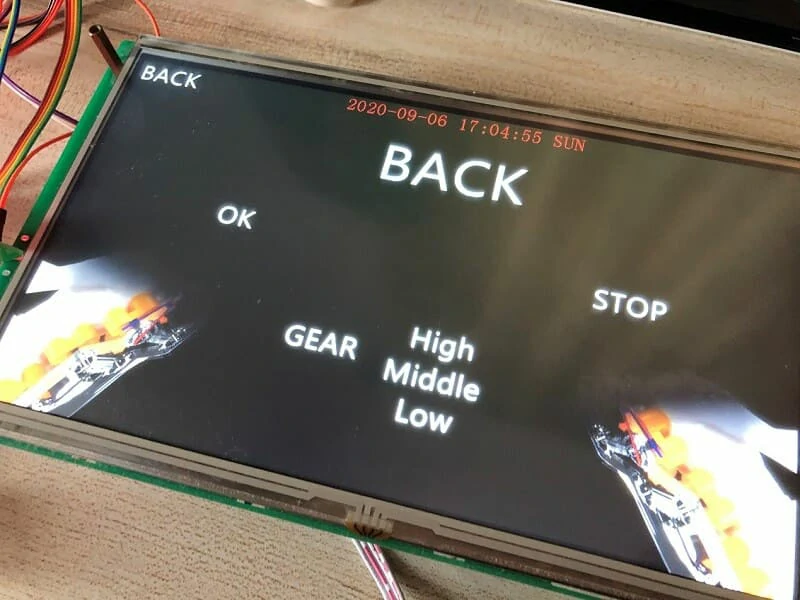
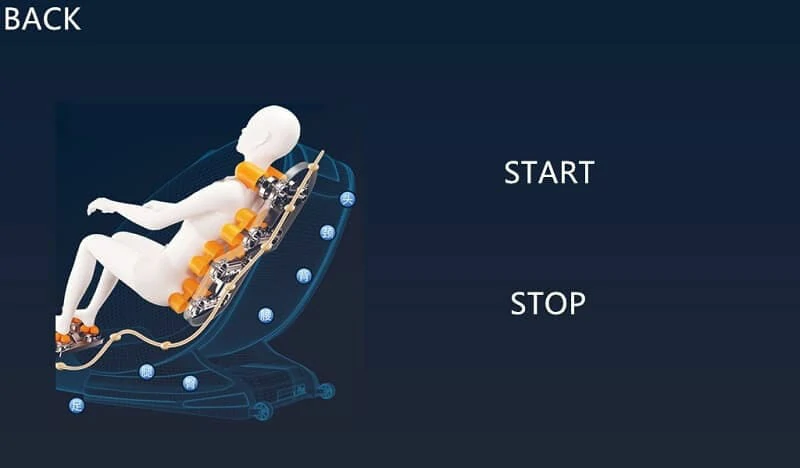
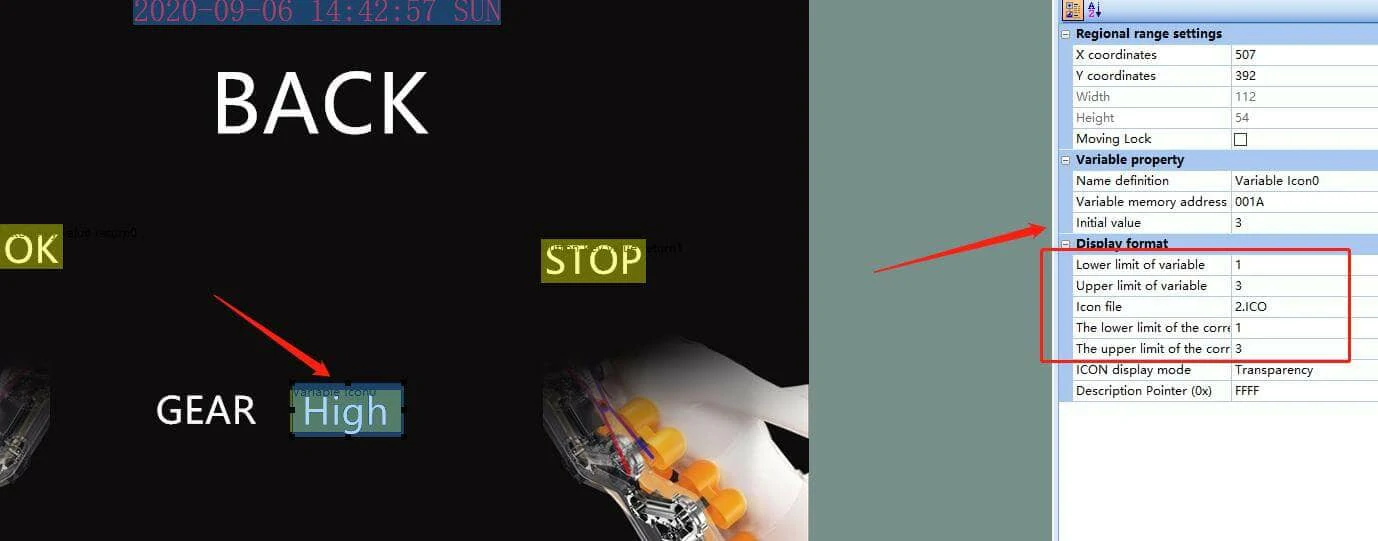
Here we do is a home massage chair application, will STONE TFT After the LCD serial screen is powered on, a start interface will appear. After a short stay, it will jump to a specific interface. This interface is used to set our current time. When setting, a keyboard will pop up. After setting, click OK to enter the massage mode selection interface. Here, I have set three modes: head massage, back massage, and comprehensive mode. In the mode, the massage intensity can be set, the high, middle, and low gears can be set, and the corresponding LED light will be used for intensity indication; the massage times can also be set, after reaching the set number, it will automatically stop; in the comprehensive model, the head and back will be massaged at the same time, and it can be turned off when it is not needed. These actions are through the STONE Touch Screen serial port screen to achieve command transmission.
The communication functions are as follows:
- The serial port screen of STONE Touch Screen realizes the function of button switching interface;
- The serial port screen of STONE Touch Screen realizes the function of an automatic jump when starting up;
- The serial port screen of STONE Touch Screen realizes time setting;
- The serial port screen of STONE Touch Screen realizes data variable distribution;
- STONE Touch Screen serial port screen realizes serial command communication.
- STONE Touch Screen serial port screen realizes the function of menu bar selection;
Modules required for the project:
- STONE Touch Screen;
- Arduino ESP32;
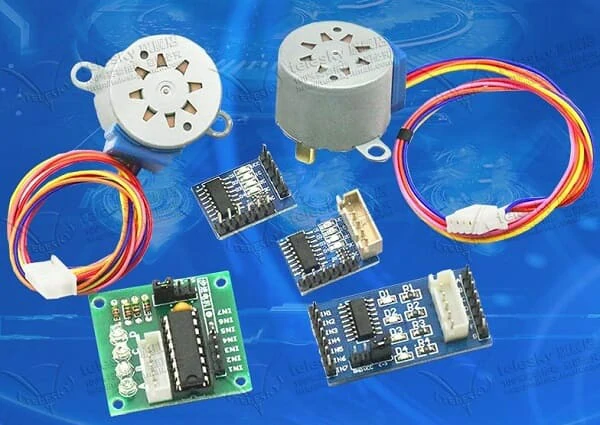
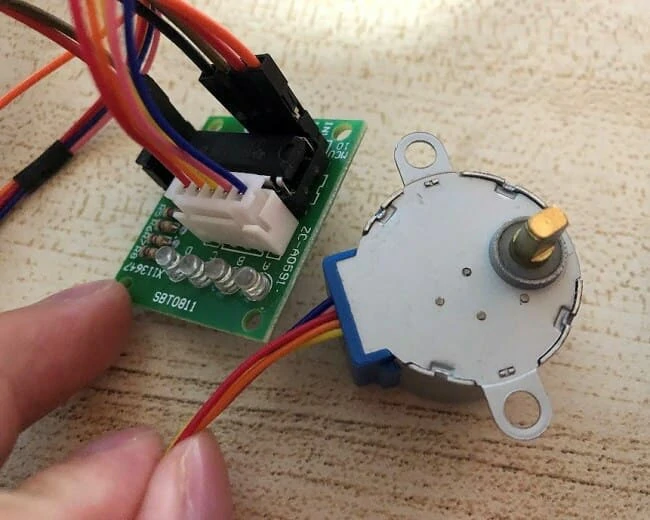
- Stepper motor drive and module;
- LED array module;
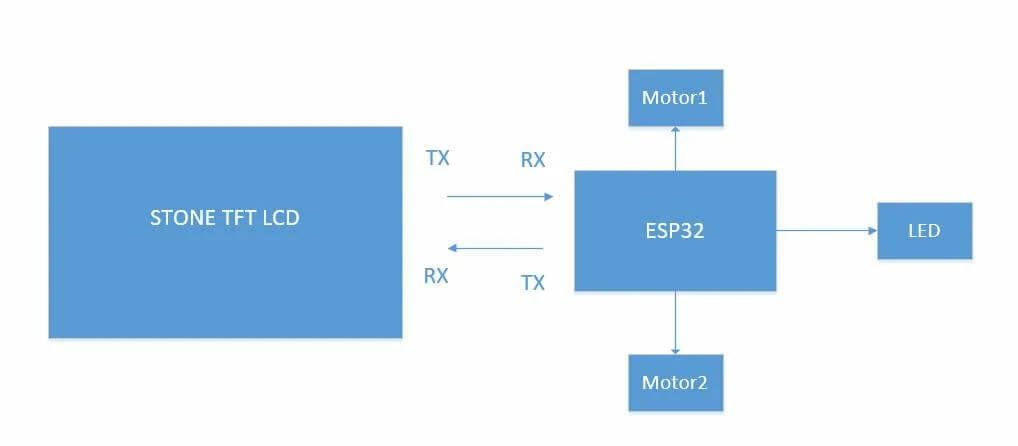
Block diagram
Hardware introduction and principle
- 10.1 inch 1024×600 industrial grade TFT panel and 4-wire resistance touch screen;
- brightness is 300cd / m2, LED backlight;
- RGB color is 65K;
- visual area is 222.7mm * 125.3mm;
- visual angle is 70 / 70 / 50 / 60;
- working life is 20000 hours. 32-bit cortex-m4 200Hz CPU;
- CPLD epm240 TFT-LCD controller;
- 128MB (or 1GB) flash memory;
- USB port (U disk) download;
- toolbox software for GUI design, simple and powerful hex instructions.
Basic functions
- Touch screen control / display image / display text / display curve / read and write data / play video and audio. It is suitable for various industries.
- UART interface is RS232 / RS485 / TTL;
- voltage is 6v-35v;
- power consumption is 3.0w;
- working temperature is – 20 ℃ / + 70 ℃;
- air humidity is 60 ℃ 90%.
STVC101WT-01 TFT display module communicates with MCU through a serial port, which needs to be used in this project. We only need to add the designed UI picture through the upper computer through the menu bar options to buttons, text boxes, background pictures, and page logic, then generate the configuration file, and finally download it to the display screen to run.
In addition to the data manual, there are user manuals, common development tools, drivers, some simple routine demos, video tutorials, and some for testing projects.
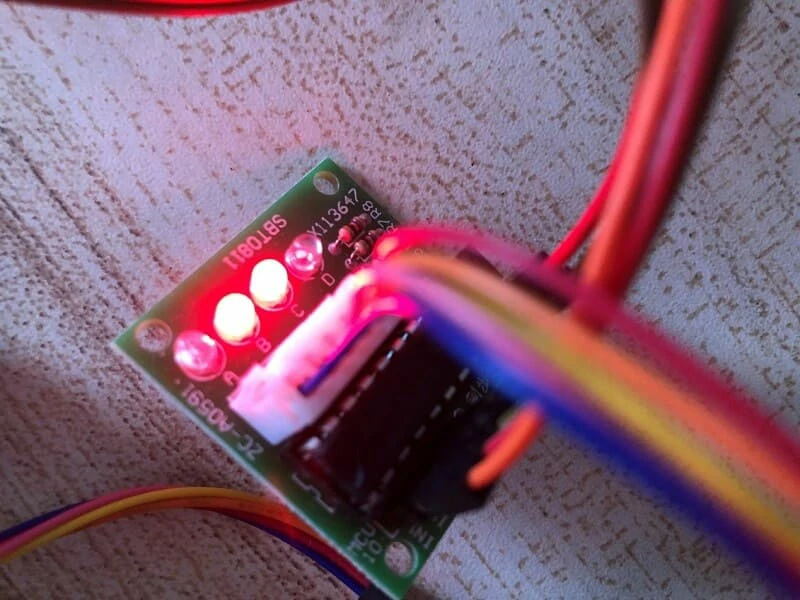
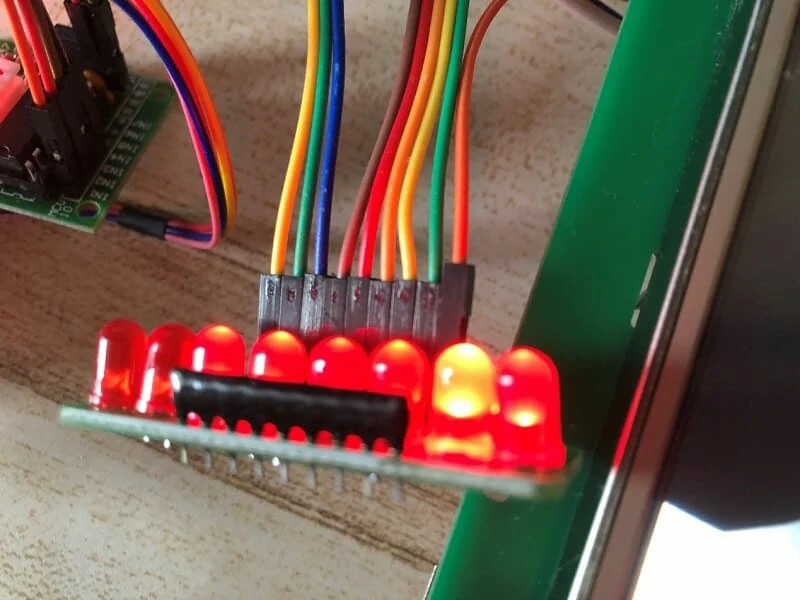
LED array module
Product features
This is a galloping lamp display module with 8 LEDs on board. The external voltage is 3-5.5vdc, and the corresponding LED can be lighted at a low level. It is especially suitable for the IO test of a single-chip microcomputer to realize indicator control.
Electrical parameters
- Working voltage: 3 – 5.5VDC
- Working current: 24Ma (maximum)
- Effective level: low level
- Number of LEDs: 8
- Display color: red (D1 / D2 / D3 / D4 / D5 / D6 / D7 / D8)
- It is very suitable for MCU experiments and DIY
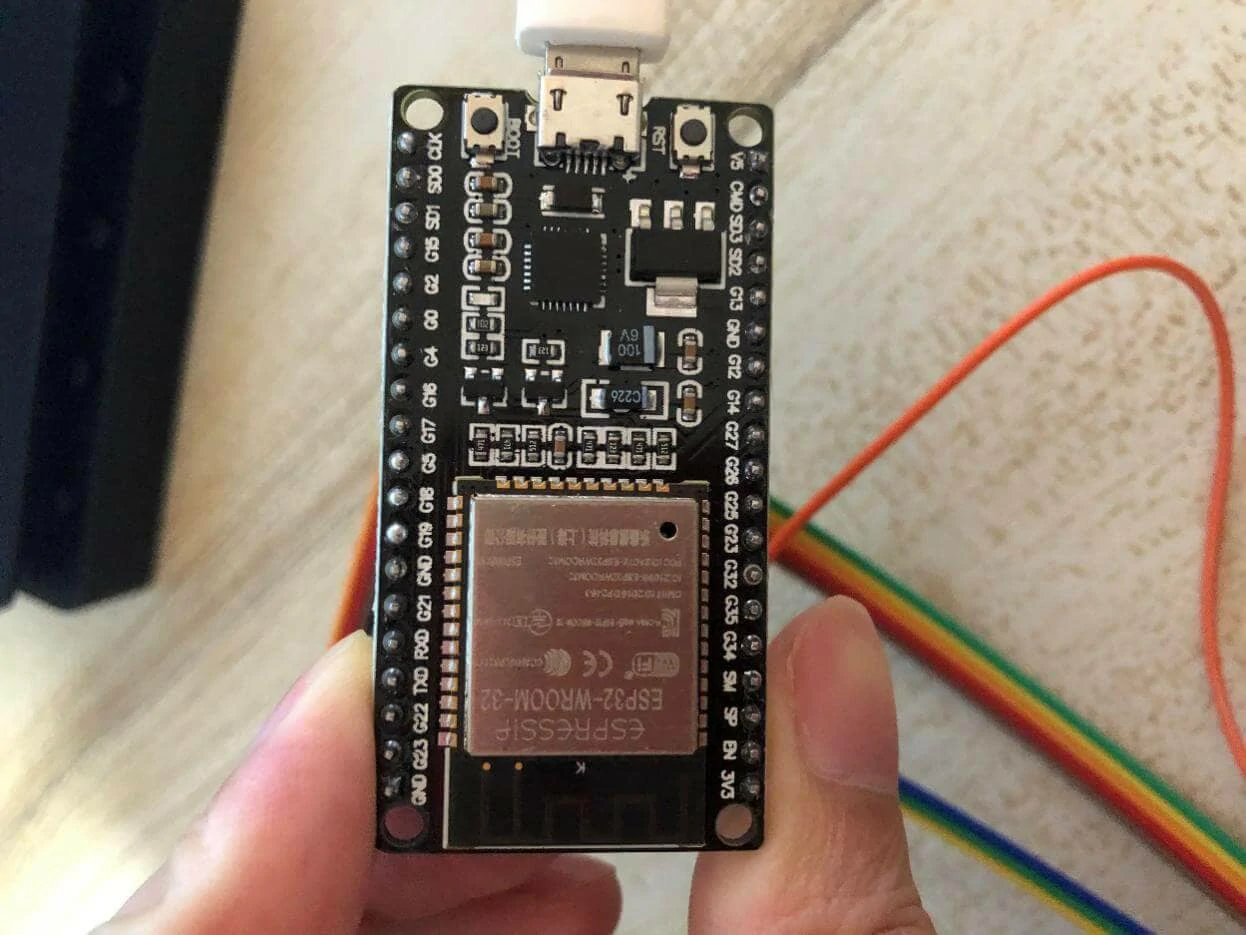
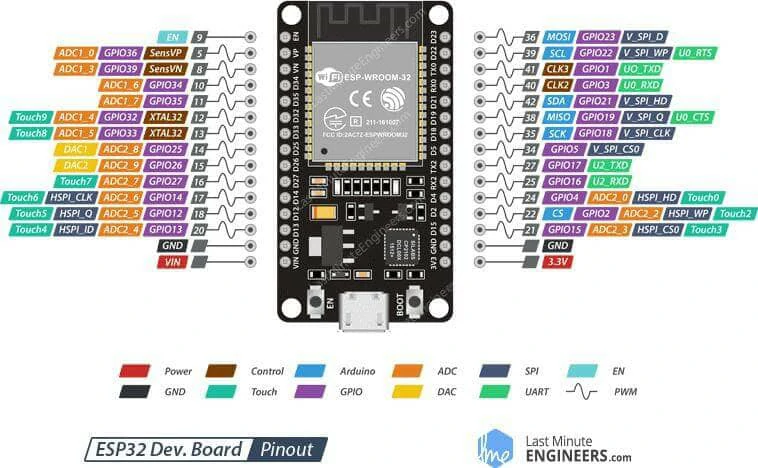
ESP32 EVB
Esp32 is a single-chip scheme integrated with 2.4 GHz WiFi and Bluetooth dual-mode. It adopts TSMC’s ultra-low power consumption 40 nm technology, with ultra-high RF performance, stability, versatility, and reliability, as well as ultra-low power consumption, which meets different power consumption requirements and is suitable for various application scenarios. At present, the product models of esp32 series include esp32-d0wd-v3, esp32-d0wdq6-v3, esp32-d0wd, esp32-d0wdq6, esp32-d2wd, esp32-s0wd and esp32-u4wdh. Esp32-d0wd-v3, esp32-d0wdq6-v3 and esp32-u4wdh are chip models based on Eco v3.
Wi-Fi
- 802.11 b/g/n
- 802.11 n (2.4 GHz) up to 150 Mbps
- wireless multimedia (WMM)
- frame aggregation (TX / RX A-MPDU, Rx A-MSDU)
- immediate block ACK
- defragmentation
- beacon automatic monitoring (hardware TSF)
- 4x virtual Wi-Fi interface
Bluetooth
- Bluetooth v4.2 complete standard, including traditional Bluetooth (BR / EDR) and low power Bluetooth (BLE)
- supports standard class-1, class-2, and class-3 without external power amplifier
- enhanced power control
Output power up to +12 dBm
- nzif receiver has – 94 DBM ble reception sensitivity
- adaptive frequency hopping (AFH)
- standard HCI based on SDIO / SPI / UART interface
- high-speed UART HCI up to 4 Mbps
Support for Bluetooth 4.2 BR / EDR and BLE dual-mode controller
- synchronous connection-oriented / extended synchronous connection-oriented (SCO / ESCO)
- CVSD and SBC audio codec algorithms
- piconet and scatternet
- multi-device connection with traditional Bluetooth and low power Bluetooth
- support simultaneous broadcast and scanning
ULN2003 Stepper Motor
Product features
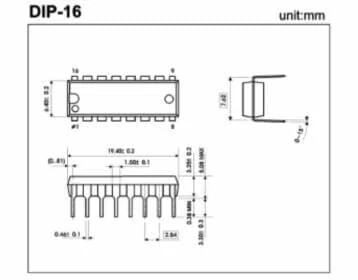
ULN2003 is a Darlington display with high voltage and high current. It consists of seven Silicon NPN Darlington tubes. Each pair of Darlington of ULN2003 is connected in series with a 2.7K base resistor. Under 5V working voltage, it can be directly connected with the TTL and CMOS circuit, which can directly process the data that needs a standard logic buffer. Here we use the DIP-16 package, 4-phase 5-wire 5V stepping motor.
Structure and Application
Arduino Development steps
Arduino ESP32
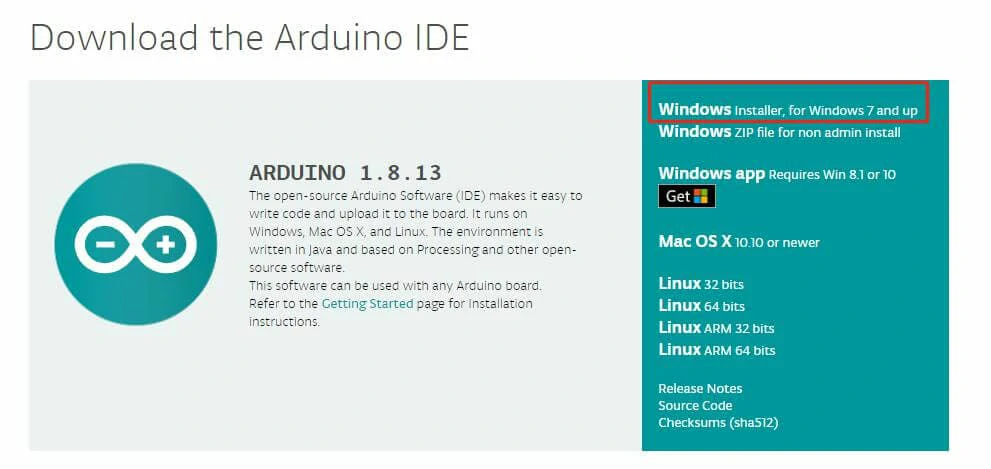
Download IDE
To complete the code development of esp32, Arduino is used to develop and compile. First, you need to install the environment and enter the Arduino official website: https://www.arduino.cc/en/Main/Software and download the version for your own platform.
Install Arduino
Double click automatic installation. It should be noted here that Arduino ide relies on the Java development environment and requires PC to install Java JDK and configure variables. If double-click fails to start, it may be that the PC does not have JDK support.
Code
//HEAD
uint8_t HeadGearHigh[9] = {0xA5, 0x5A, 0x06, 0x83, 0x00, 0x0E, 0x01, 0x00, 0x03};
uint8_t HeadGearMiddle[9] = {0xA5, 0x5A, 0x06, 0x83, 0x00, 0x0E, 0x01, 0x00, 0x02};
uint8_t HeadGearLow[9] = {0xA5, 0x5A, 0x06, 0x83, 0x00, 0x0E, 0x01, 0x00, 0x01};
uint8_t HeadTiming[9] = {0xA5, 0x5A, 0x06, 0x83, 0x00, 0x11, 0x01, 0x00, 0x09};
uint8_t HeadModeStart[9] = {0xA5, 0x5A, 0x06, 0x83, 0x00, 0x19, 0x01, 0x41, 0x61};
uint8_t HeadModeStop[9] = {0xA5, 0x5A, 0x06, 0x83, 0x00, 0x24, 0x01, 0x46, 0x66};
//BACK
uint8_t BackGearHigh[9] = {0xA5, 0x5A, 0x06, 0x83, 0x00, 0x1A, 0x01, 0x00, 0x01};
uint8_t BackGearMiddle[9] = {0xA5, 0x5A, 0x06, 0x83, 0x00, 0x1A, 0x01, 0x00, 0x02};
uint8_t BackGearLow[9] = {0xA5, 0x5A, 0x06, 0x83, 0x00, 0x1A, 0x01, 0x00, 0x03};
uint8_t BackModeStart[9] = {0xA5, 0x5A, 0x06, 0x83, 0x00, 0x0C, 0x01, 0x42, 0x62};
uint8_t BackModeStop[9] = {0xA5, 0x5A, 0x06, 0x83, 0x00, 0x0D, 0x01, 0x43, 0x63};
//Integrated
uint8_t IntegratedModeStart[9]= {0xA5, 0x5A, 0x06, 0x83, 0x00, 0x0F, 0x01, 0x44, 0x64};
uint8_t IntegratedModeStop[9] = {0xA5, 0x5A, 0x06, 0x83, 0x00, 0x1F, 0x01, 0x45, 0x65};
STONE TOOL 2019
New Project
Find the tool 2019 directory and double-click to open STONE Tool 2019

Click new project and make changes to the resolution, project name, and save path.

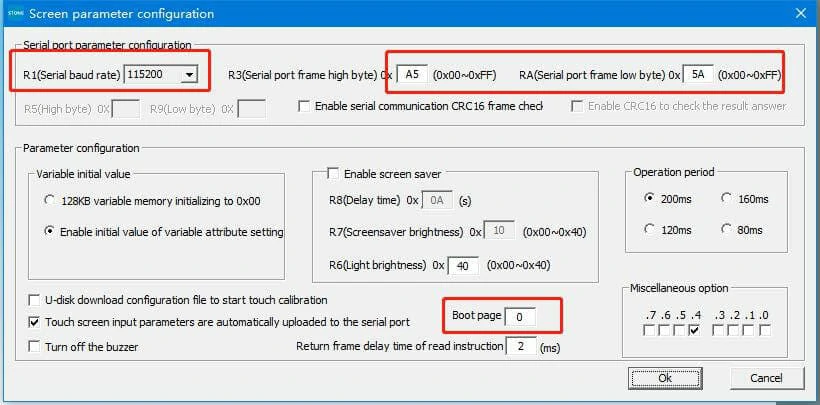
Then set the boot page, and set the communication packet header:
Add picture
By default, there is a blue back image after a new project is created.
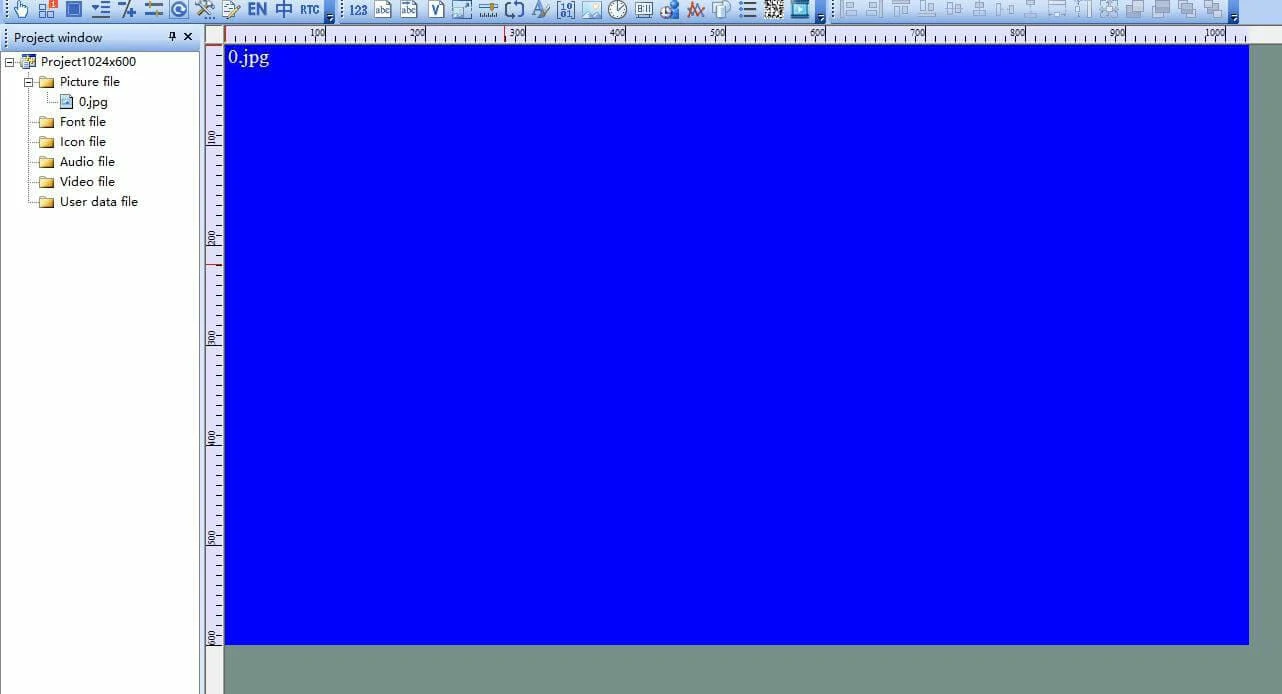
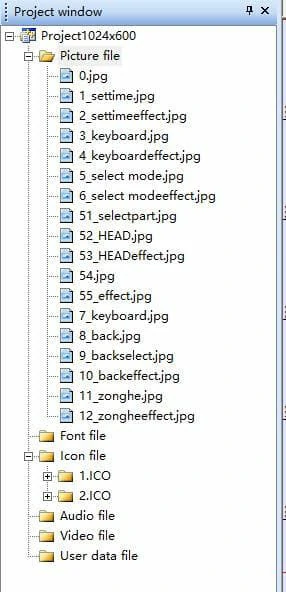
Right-click 0.jpg and select remove to delete it. In the same way, select Add to add the image required by the project.
The setting of the selection interface
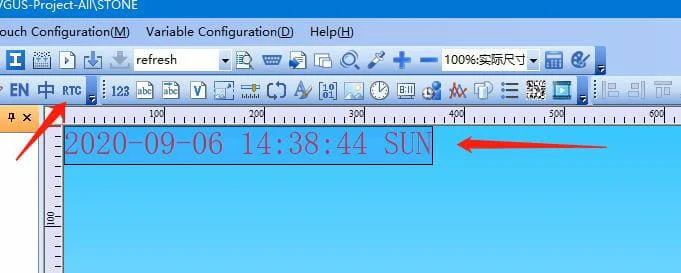
RTC
To set the time function, first, add a clock setting control.
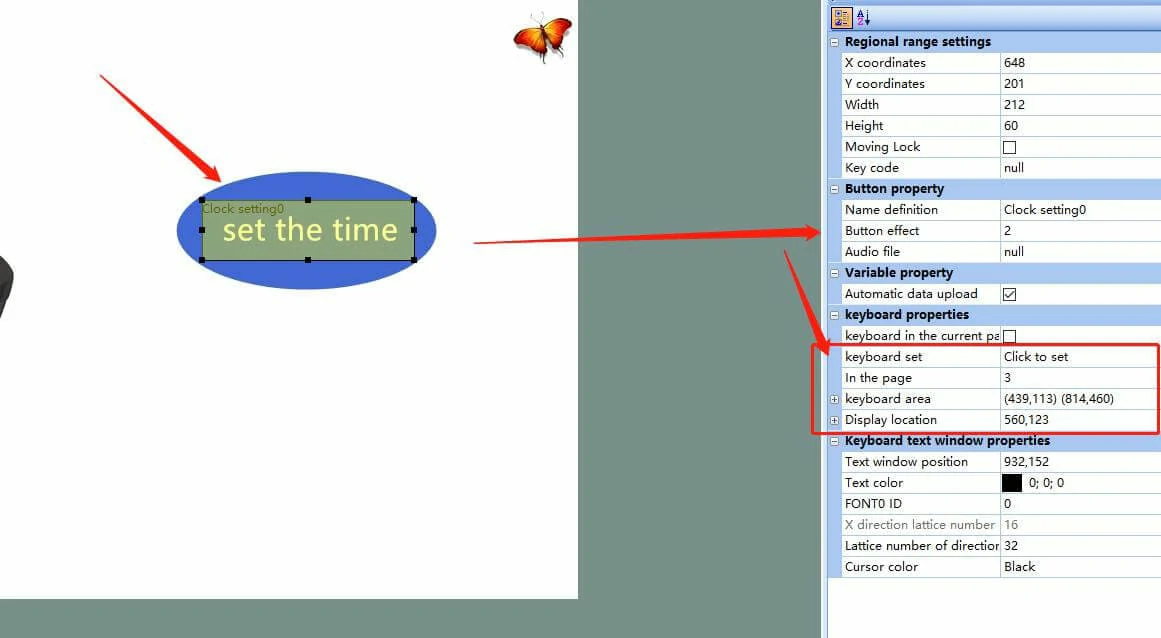
Add an RTC control.
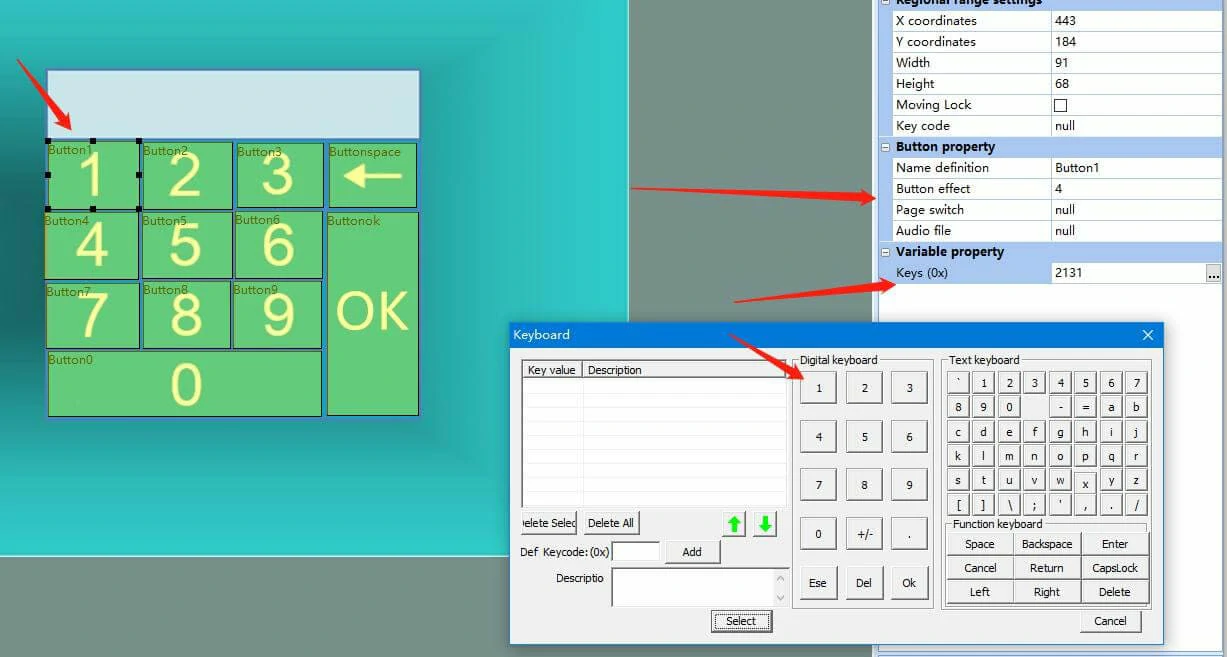
To make an input keyboard, we need to add a button control to each array and give the corresponding key value.
Menu bar selection
Add the menu bar control, set the initial value, and add the corresponding ICO library.
Page jump function
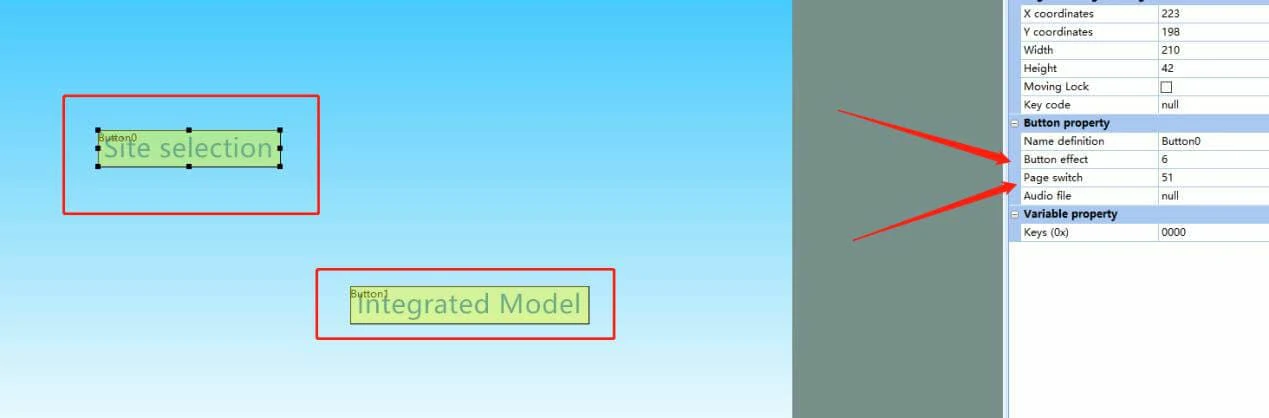
You can set the button effect and the switch page, and the switching interface effect of other buttons is also similar.
Key command setting
Each button needs to be given corresponding action, so the following settings are made:
//HEAD
uint8_t HeadGearHigh[9] = {0xA5, 0x5A, 0x06, 0x83, 0x00, 0x0E, 0x01, 0x00, 0x03};
uint8_t HeadGearMiddle[9] = {0xA5, 0x5A, 0x06, 0x83, 0x00, 0x0E, 0x01, 0x00, 0x02};
uint8_t HeadGearLow[9] = {0xA5, 0x5A, 0x06, 0x83, 0x00, 0x0E, 0x01, 0x00, 0x01};
uint8_t HeadTiming[9] = {0xA5, 0x5A, 0x06, 0x83, 0x00, 0x11, 0x01, 0x00, 0x09};
uint8_t HeadModeStart[9] = {0xA5, 0x5A, 0x06, 0x83, 0x00, 0x19, 0x01, 0x41, 0x61};
uint8_t HeadModeStop[9] = {0xA5, 0x5A, 0x06, 0x83, 0x00, 0x24, 0x01, 0x46, 0x66};
//BACK
uint8_t BackGearHigh[9] = {0xA5, 0x5A, 0x06, 0x83, 0x00, 0x1A, 0x01, 0x00, 0x01};
uint8_t BackGearMiddle[9] = {0xA5, 0x5A, 0x06, 0x83, 0x00, 0x1A, 0x01, 0x00, 0x02};
uint8_t BackGearLow[9] = {0xA5, 0x5A, 0x06, 0x83, 0x00, 0x1A, 0x01, 0x00, 0x03};
uint8_t BackModeStart[9] = {0xA5, 0x5A, 0x06, 0x83, 0x00, 0x0C, 0x01, 0x42, 0x62};
uint8_t BackModeStop[9] = {0xA5, 0x5A, 0x06, 0x83, 0x00, 0x0D, 0x01, 0x43, 0x63};
//Integrated
uint8_t IntegratedModeStart[9]= {0xA5, 0x5A, 0x06, 0x83, 0x00, 0x0F, 0x01, 0x44, 0x64};
uint8_t IntegratedModeStop[9] = {0xA5, 0x5A, 0x06, 0x83, 0x00, 0x1F, 0x01, 0x45, 0x65};
Connection
Code
/*
Stepper Motor Control - one revolution
This program drives a unipolar or bipolar stepper motor.
The motor is attached to digital pins 8 - 11 of the Arduino.
The motor should revolve one revolution in one direction, then
one revolution in the other direction.
Created 11 Mar. 2007
Modified 30 Nov. 2009
by Tom Igoe
*/
For complete code and project documentation, please contact us: https://www.stone-hmi.com//contact
STONE Touch Screen with ESP32 Application of massage chair Appendix